|
|
NOTE: Depending on the method of access and your current permissions, the page displays differently and some information may be disabled or unavailable. |
Use this tutorial to add a household transfer for a child to a new household on the Transfer History page.
Complete the following steps to perform this tutorial:
Display the Transfer History page.
|
|
NOTE: Depending on the method of access and your current permissions, the page displays differently and some information may be disabled or unavailable. |
Click the Household Transfer button. The page refreshes and displays a Household Transfer section with additional fields for entry.
View the child details in the Household Transfer section.
Child ID displays the child's unique identification number.
Child Name displays the child's first and last name.
The data in this section of the page is read-only.
View the details of the household from which the child is transferring in the Move From Household section.
Head of Household displays the first and last name of the person designated as head of the household.
Household ID displays the household's identification number.
The data in this section of the page is read-only.
Indicate whether the child is transferring to a new household or an existing household in the Move To Household section.
The radio button group in the Move To Household section provides access to various functions on the page. The radio button group consists of the following radio buttons:
Select the Add New Household radio button to indicate that the child is transferring to a new household.
Select the Existing Household radio button to indicate that the child is transferring to an existing household. This radio button is initially selected as the default.
When moving to a household, the page displays differently and some information may be disabled or unavailable.
Select the Add New Household radio button. The page refreshes to display a New Household section.
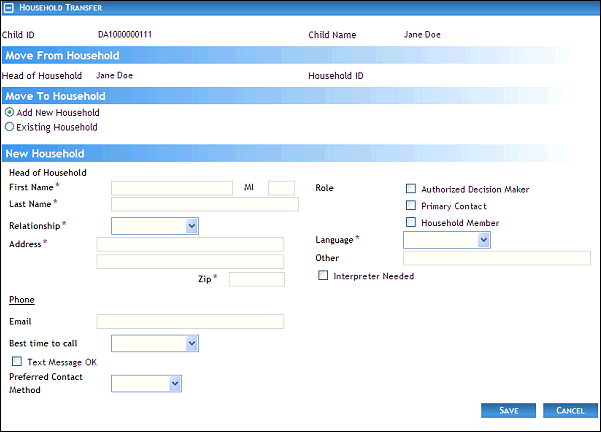
Transfer History page (new household detail view)
The New Household section contains fields to enter the head of household's data and contact information, which can be updated as follows:
In First Name, enter the first name of the person. At least two characters must be entered. You can enter up to 25 characters as necessary.
In Middle Name, enter the middle name of the person.
In Last Name, enter the last name of the person. At least two characters must be entered. You can enter up to 40 characters as necessary.
In Relationship, select the specific relationship in the household to assign to the person from the drop-down list.
In Address, enter the street address at which the residence (or office) is located. You can enter up to 100 characters as necessary in each of the two address controls as necessary.
In ZIP, enter the complete five-digit ZIP code in which the residence (or office) is located. Once entered, the name of the city and the two-character state abbreviation associated with the ZIP code are displayed.
In Phone, enter one or more telephone numbers at which the person can be contacted. For more information about entering telephone numbers, see the Telephone Numbers topic.
In Email, enter the electronic mail address for the person. Email addresses must be entered in the format of: name@xxx.zzz. At least 10 characters must be entered, and you can enter up to 50 characters as necessary.
In Best time to call, select the best time of the day to contact the person by phone from the drop-down list.
In Text Message OK, select the check box to indicate whether it is acceptable to send text messages to the phone number listed.
In Preferred Contact Method, select the preferred method of contacting the person from the drop-down list.
In Role, select one or more check boxes to assign specific roles to the person.
In Language, select the person's primary language from the drop-down list.
In Other, enter the person's secondary or alternate language. Up to 40 characters can be entered as necessary.
In Interpreter Needed, select the check box to indicate whether an interpreter is needed for verbal communication.
|
|
NOTE: Asterisks (*) indicate which fields are required on the page. If required information is missing, an error message displays at the top of the page after saving the data. |
Click the Save button. The page refreshes and displays the new information in the Transfer History table.
Version 1.6